* Home  
Beaded Crafts  
Kids Craft Patterns  
Lighted Craft Projects  
Other Craft Instructions  
Jewelry Craft Projects  
Wearable Projects  
Plastic Canvas Projects  
Other Holiday Craft Ideas  
Christmas Crafts  
Halloween Craft Projects  
Fall Craft Ideas  
Easter Craft Instructions  
   
* Contact Us  
   
 
Please help support our site by visiting the sponsors in our ads.


Place your ad or website information on every page of our website. Contact us for more details.

Your donations help us to be able to add more free craft patterns to this site for you. We Thank You.


Instructions for Safety Pin Bracelet with Acrylic Beads from Craft Supply Depot - Safety Pin Jewelry Instructions - Free Instructions - Free Jewelry Craft Project Ideas


Safety pin jewelry is a great way to create unique pieces to match your wardrobe. This variation is made with 4mm acylic faceted beads in the colors of your choice. Your friends will be surprised when you tell them it is made with safety pins.


Materials Needed:

Instructions

Bead Sequence for Safety Pin Bracelet - Safety Pin Jewelry

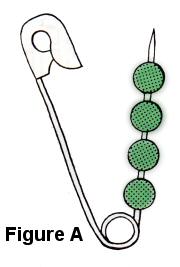
Make 20 - Thread beads onto pin using the pattern in Figure A. Dip the end of the safety pin in glue and close pin.

Safety Pin Jewelry - Bead Sequence for Safety Pin Bracelet

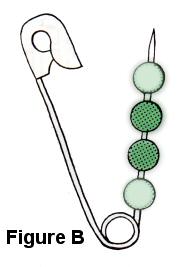
Make 40 - Thread beads onto pin using the pattern in Figure B. Dip the end of the safety pin in glue and close pin.

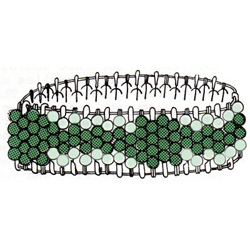
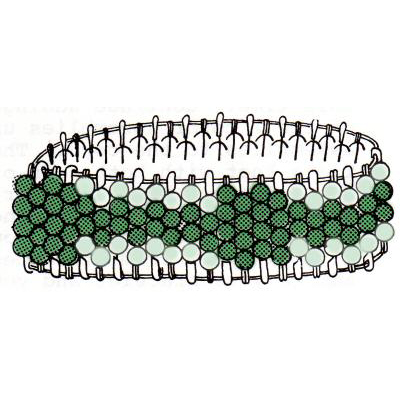
Cut 2 lengths of your cord, approximately 8" to 12" long. Slide one length of cord through the hole in the bottom of a finished safety pin, then through the hole in the head of the next safety pin. Continue stringing safety pins, alternating threading the head and the bottom of the pin until desired length. Securely tie the ends of the threaded stretch cord and dot knot with glue. Trim cord and tuck remaining ends back into the holes of the safety pins and secure with a spot of glue onto the inside of one of the safety pins.

Thread the second piece of stretch jewelry cord through the opposite end of each pin, making sure to string them in the same order as they are on the first cord. Knot securely, trim and dot knot with glue, tuck remaining ends into the safety pin holes and hold with a spot of glue in the inside of one of the safety pins.


Please Read: After you have finished with this free pattern won't you please be kind and say thank you by clicking on just one of the ads on this page. It doesn't cost you anything and any revenue generated also helps you because it allows us to be able to share this site with you at no chargea and to be able to add more patterns and helpful information for you. We sincerely thank you!
 

Copyright © 2008-2024.  All rights reserved.